on
Particles
Simple Particle Simulation in C++:
The title says it all! In this project I wanted to use a simple library that would allow me to create a GUI of a particle simulation. After searching around, I decided to use Simple DirectMedia Layer, better known as SDL for its simplicity and plethora of online resources in case I get stuck. In order to learn the library I used SDL’s documentation and followed a YouTube channel to help structure my project. I mainly wanted to do this project to sharpen my C++ skills and learn how to create a simple GUI using a C++ library. I mainly drew inspiration from reading about people creating fire simulations in assembly online. I figured if people could accomplish this using only assembly, then I could create my own version in C++ with enough time and effort.
C++
Initially I considered doing this project in Java but ultimately opted for C++ to practice my skills in C++ and because I wanted more of a challenge since C++ is more error prone and demands the programmer to manage memory allocation. Although C++ and Java are syntactically similar, the two programming languages have some very stark differences. Java follows the programming paradigm of object oriented programming while C++ is both procedural and OOP. Java has a garbage collector while C++ doesn’t meaning you have to allocate and deallocate memory manually on the heap in order to avoid garbage values and potential bugs. This is what I meant when I said C++ is in most cases more error prone than most languages. This caused a strange bug that I kept getting during runtime early on in development which I talk about later in this article. C++ arguments can be passed by value or by reference by utilizing references and pointers. Java passes by value through primitive types and passes by reference through objects when calling functions. Java follows a ‘WORA’ approach (write once, run anywhere) by using the JVM (Java Virtual Machine) which translates byte code into machine code so that it can be ran on any system. An entire article could be written on the differences between the two languages but for the rest of the article, I will focus on my approach and creating this project.
Setting Up SDL to Work in Xcode
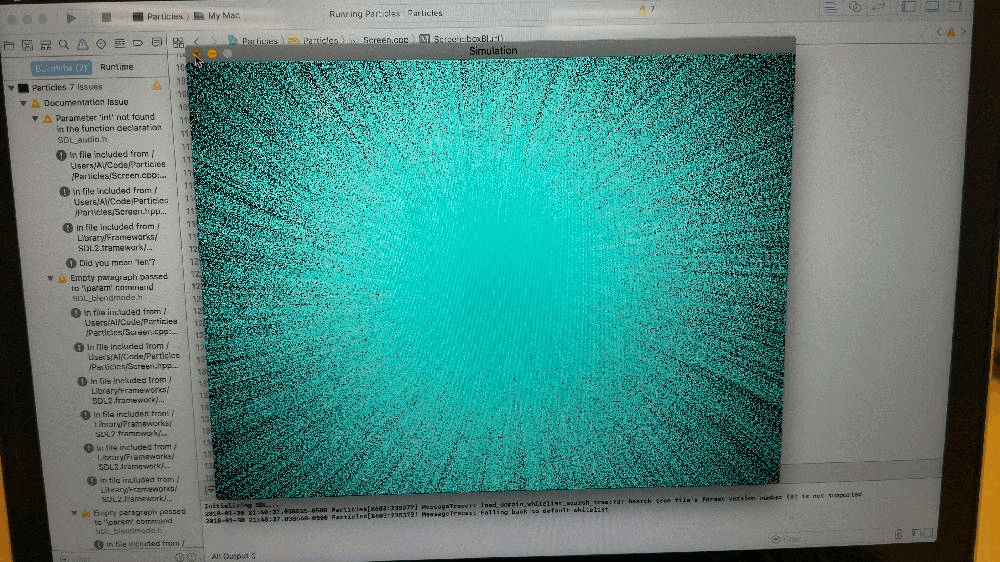
![]()
Despite its ease of use when setting it up on Windows and Linux, SDL seemed unnecessarily difficult to set up on macOS. I ran into a few issues but after scouring the internet, I found a guide that allowed me to get the SDL library up and running. I was able to verify that SDL was linked into my Xcode project by running the following code in the main method:
if (SDL_Init(SDL_INIT_VIDEO|SDL_INIT_AUDIO) != 0) {
        SDL_Log("Unable to initialize SDL: %s", SDL_GetError());
        return 1;
    }
    SDL_Quit();
Straight from SDL’s documentation, the code above is used to initialize the SDL library. If SDL is properly configured and present in the working project tree, the test program will return no errors, otherwise it is going to a negative value. I decided to make the following classes: Particles, Swarm, & Screen along with header files for each respective class.
Particles:
This class focused on the characteristics of each particle, namely speed and direction when they ‘explode’. This is by far the smallest of the classes.
Swarm:
Swarm focused on the particles as a whole. In this class
I set a const int of the number of particles the program
will have in total. The swarm of particles is then updated
based on the speed of the user’s computer. This is done by
calculating how long it takes the user’s computer to run
update() which is called in main in a forever while loop. The difference between each interval is multiplied by the
double xSpeed and double ySpeed and assigned to member variables m_x and m_y. This makes the particles animation based on how fast the computer can complete the method each time. Slower computers that take longer to compute will have a higher interval value each time
that will cause the particles to go farther every update. This allows both fast and slow computers to run the program effectively and at a constant speed.
Screen:
Screen class was created to handle to actual window that
pops up when the program runs. By default, the window is
800px wide and 600px tall. The class consists of
SDL type objects. The object pointer window is the actual window that
displays the program. Textures are processed in the buffer by the renderer and
then displayed by the window. As previously stated in the C++ section of this article,
I had a mysterious EXC_BAD_ACCESS memory bug that occurred during runtime. This
was accidentally caused by me by initializing an SDL unsigned 32-bit integer that was
already initialized elsewhere in the program. This caused the pinter to be confused
on what unsigned integer was I referring to. The reason I specifically needed to
use SDL’s version of a Uint32 was to avoid the potential bug of an int being a
different value on a different computer or operating system although after researching
the topic more, I could have added <inttypes.h> to the top of all my headers and
created int32_t variables as needed.
Screen:
Screen class also does a lot of the behind the scenes
work as well such as ensuring that the components that
made up the display such as the renderer, buffer,
and texture were properly destroyed in the close()
method. Other methods like update(), as the name
suggests updates the screen every time it is called in a
loop.
I learned how to do the pulsating effect between two colors through the
Cave of Programming
YouTube channel. The basic idea is to use sine
and cosine to calculate a value between 0 and 2
by multiply an arbitrary number by the variable elapsed and adding 1 since a value in
sine or cosine can be negative but a color can not have a negative value in the world programming.
The value is then multiplied by 128 to get an RGB value between 0 and 255. The numbers are then casted
into unsigned chars which is OK to do since the values should not be negative anyway and because char is
technically an int value.
The process can be seen below:
unsigned char red = (unsigned char)((1 + sin(elapsed * 0.002)) * 128);
unsigned char green = (unsigned char)((1 + sin(elapsed * 0.002)) * 128);
unsigned char blue = (unsigned char)((1 + cos(elapsed * 0.002)) * 128);
This value is then saved to a
char variable to be passed into the setPixel() method where the hex value is
calculated by adding the chars of red, green, and blue into a hex value using the
addition operator (+) and the shifting bitwise left operator («).
I set mine up to pulsate between an aqua blue and red. It is a simple program
but I’m happy with how it turned out:
Future Plans & Takeaways
I decided to intentionally write a blog post about this project in particular to make sure that I completely understand the program, the SDL library, and all my memory management done with pointers, references, and SDL objects. Through the assistance of this YouTube channel, I can now create basic GUI’s using SDL. Looking back in hindsight, there were probably easier, more up-to-date libraries that I could have used such as the robust Qt framework or the incredible Cinder library but SDL is still a solid GUI library regardless and I am confident that what I learned will transfer to other GUI frameworks and libraries one way or another.
I do not consider this program completely done. I still plan on adding a menu prompt that pops up before the program automatically runs that asks the user to enter RGB values to set the color of the particles and to implement a specific list of behaviors on how the particles flow in the program. For those interested, I have uploaded my project along with all my others to my Github account. This will have to be put on the back burner at the moment because all my electronic parts that I ordered online finally came and I want to create a project that I have been meaning to do for a very long time. Until then, stay tuned!