on
Translator
A Handheld Translator for the Price of Lunch
I always wanted to travel abroad while in college but couldn’t since I was an RA. Eventually I do plan on traveling once the COVID settles down but in the meantime I’m stuck at home. To keep myself occupied, I thought of a cool idea I wanted to do: create a handheld translator using a Raspberry Pi that listens to my voice, translates it, and speaks the result. Here’s how I did it.
Gather the Parts
Here is a parts list to make the project
- a Raspberry Pi (any model works)
- LED lights to provide visual feedback to the user while translating
- an amp compatible with the Pi if you plan on using a speaker, otherwise you can just use the headphone jack (I used the PAM8302 which requires soldering)
- LiPo battery + Power Supply (I used a PowerBoost 1000C with a generic LiPo battery on Amazon)
- a USB microphone (anyone on Amazon should work)
- speakers
- button
- wires
- Pi case (originally I had designed and 3D printed my own case but the button and the laptop speaker wouldn’t fit so I’ll have to redesign a larger one in the future).
The parts list is pretty straightforward. To make the Pi portable, you need a power supply and LiPo battery so you can power and charge it. The amp is needed for sound. You could use an external speaker connect to the Pi via a 3.5mm headphone jack though this does not support input (microphone). I used the amp listed above and connected some old laptop speakers to it to produce sound. It ended up working out really well although I now need to create a new 3D case for the Pi to accomodate for the speakers. Adding the button and LEDs to the Pi was easy but I made sure the run some tests to make sure things were working accordingly. The LEDs tell the user when the Pi is ready for input while the button is used to start dictating and translating the user’s voice.
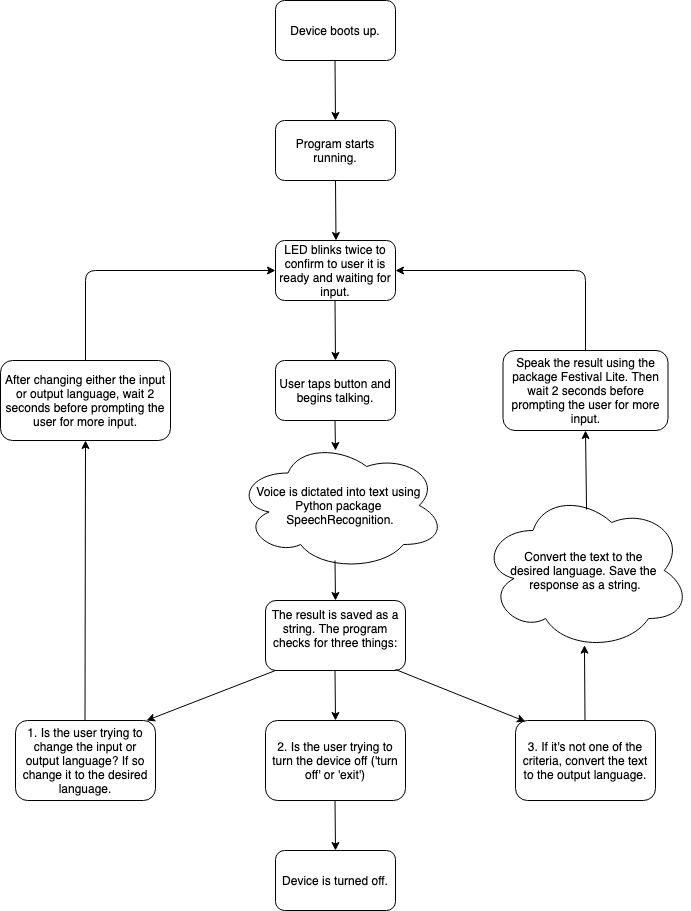
The Interface
I wanted to make the user interface as intuitive as possible. My goal was to create something that anyone could master in about 5 minutes. I decided on this:
Configuring the Program to Run at Boot
I decided to devote one of my Pi’s specifically for this project so whenever Pi
boots, the translator starts as soons as possible. This was accomplished by
running the main.py from its absolute path from the rc.local file. I ran
into an issue where my program would fail when runinng from the rc.local file.
The problem was that when I initially set up the Python package environment, I
did so as a regular user (pi). The problem is rc.local runs as root, which
does not have access to the Python environment that I created under pi. So I
had to reinstall everything as root and the problem when away.
Dictation
I came across some other challenges along the way. I initially wanted to create an offline translator. I used a program created by Carnegie Mellon called PocketSphinx that was designed for offline voice dictation. The problem was it was cumbersome to set up, especially on Linux and once it was set up, it was impractically slow and inaccurate despite tuning the model. Plus the language models took up a lot of space on my micro SD card. If I wanted to make my translator universal, I would need to download all the models PocketSphinx offered which wouldn’t fit on my SD card.
I also came across a bug when building the project with make. It relied on
packages m4 and autoconf which were not installed on my system. Once
I realized this I downloaded the wrong versions for each of them. Eventually I
got things working but was disappointed by the performance and accuracy in the C
implementation of PocketSphinx. The Python wrapper was even slower. There was
no way I could use it for my project. The group behind PocketSphinx is now
creating a new project that appears to do the same thing called Vosk but I
assumed I would run into similar problems.
At this point in my project I was not confident that offline voice dictation would be practical so I opted for Google’s Web API which is fast and accurate. This made all the difference in the world. A person’s voice would be transcribed in realtime, sent to Google Translate, and translated perfectly. Once I got the functionality and performance taken care of, I focused my efforts on the interface.
How it Works
I wanted to provide simple and intuitive feedback to the user whenever they interact with my translator. Once the program is ready, it beeps and blinks twice to let the user know its ready. The user then taps the button and begins talking. After the user is done talking, the Pi translates the text and speaks the translated text. After that the Pi beeps and the LEDs blink twice again and the process starts over. To change the source (the language you speak) or the target language (the language you want to translate into), say ‘set source to …’ or ‘set the target to …’ respectively in any lanuage and the translator takes care of the rest. This is accomplished by translating ‘set source / target to …’ into English under the hood. To turn the device off, simply say ‘exit’ or ‘turn off’ in any language you like. I really don’t think the interface could be any simpler! I really tried to make it as easy as possible and it works (in my experience) really well!
Code
If you’re interested in learning more about this project, check out the source code here.